Monday, December 29, 2008

BBTB + PageMaps = Fun & Funky!


Regina at BBTB challenged us to use this funky dot-bordered circle from Mini-Monograms this week, and my first thought was that it would make a great flower center for a cute fabric yo-yo flower. I'm officially obsessed with making these. They are so easy -- I got instructions from Heather Bailey's awesome blog. The sketch is the current challenge from PageMaps -- if you haven't checked out this awesome site, it is a total must-visit for scrappers and card makers.

Make sure you visit BBTB this week, because SweetArts Paperie is sponsoring a card contest with a fabulous prize kit. Can't wait to see what you create!

Materials:
Dotted Circled -- CRCLDOTS cut from Cricut Mini-Monograms cartridge, cut at about 1 3/4"
Patterned paper -- Basic Grey
Stamps -- Stampin Up
Cardstock -- DCWV, Georgia Pacific
Scallop Scissors & punch -- Fiskars

Monday, December 22, 2008

Christmas Thoughts

I can't post my current projects yet because they're Christmas presents, and I don't want anyone peeking! :) But I wanted to share some things I've been thinking about this Christmas, so here's a post from my family blog.


The Secret to World Peace...


... is light-up snowboots.

Let me explain. Every other Christmas, our family does a service Christmas. This year we learned about families from Bhutan who have recently arrived in Utah as refugees -- before this they were refugees in Nepal for 17 years, living in bamboo and plastic huts on 150 grams of rice per day and occasionally a few vegetables. They came here with nothing. This last Friday we took three little families out to dinner and then to Wal-Mart to help with necessities. Their clothes were ragged and ill-fitting, and most of them had only sandals. One young mom was wearing a pair of flip-flops, carrying her daughter who had no shoes at all.

Another little family had two boys who were 5 and 3, just like Sammy and Josh. When we got to dinner, Sammy eyed the boy his age nervously. He wanted to make friends but was feeling very shy, especially because the other boy didn't speak very much English. I could see that the other boy was curious about Sammy, too, but was probably even more scared than Sammy. Throughout dinner he waffled back and forth about whether to go meet the other boy. Then Amy found out that what the other boy wanted more than anything else was snow boats. This was something Sammy could understand. Just that morning I had dug out the snowboots for the boys (thank goodness last year's boots still fit Sammy and Sammy's boots from two years ago fit Josh now), and they were so very excited to wear them out in the snow. Soon Sammy was running over to the other boy, showing him how his boots lit up when he stomped his foot and promising to help him find light up boots, too. He found out the other boy's name was Tila, and they were suddenly best buddies. Josh quickly followed his lead and made friend's with Tila's little brother with a hearty "Let's hold hands!"

When we got to Walmart, the boys wanted to get right back to the shoe department to search for light up boots. To all of our disappointment, Walmart didn't have any light up boots this year. As I helped Tila try on the different styles of boots, he kept asking "No lights?" We did find him some nice warm boots that had cool reflectors, but he was obviously disappointed about the no lights situation. Sammy reassured him that it was okay, because they both still had really cool boots, and they got back to happily chasing each other around the shoe department. When we had to go home, Sammy was sad to leave his new friend and would only do it because I promised we'd get to see Tila and his family again.

Which brings me to why snowboots are the secret to world peace. Sammy and Tila were a little shy and afraid to meet one another until they discovered one really cool thing that they had in common. Once they took that first step, they found that they also both liked to run around and be crazy and laugh. It didn't matter so much that they didn't have a common language or that they'd never met. Joshy and Tila's little brother didn't even need that -- they just needed someone to point them both in each other's direction. So many of the world's problems are caused by an "us vs. them" mentality -- we look at people who are different from us, no matter what the difference is -- and sometimes we're a little scared to go out on a limb. We don't know how they'll receive our efforts. We don't know them or their motivations. It might be someone from across the world or across the street. But when we find something that unites us, it opens up a whole world of possibility. We are all truly our Heavenly Father's children and He loves each of us. Those of us who have been blessed with so much can do more than we even know to bless the lives of our brothers and sisters, if we're willing to open our hearts to them, if we give them the benefit of the doubt and realize that they are more like us than we realize.

Today as the snow swirls around our comfy, cozy house, I am so grateful for the incredible blessings we've been given. And I'm thankful to know that Tila and his little brother and his mom and dad have warm boots and coats today. But there are still so many that lack even these basic necessities. Please don't forget them. My sister Amy has just started a charity called "Neighbors Against Hunger" to help the many Bhutanese families who have just come into our community, and others like them. If you'd like more information about how you can help, please check out the information on the Neighbors Against Hunger Facebook group. Every little bit helps!

Thursday, December 18, 2008

These little piggies!


It's been quite a while since I got some 12x12 pages done -- I've been mostly doing cards and mini-albums lately. But I just had to scrap these adorable pics of Eliza with her first pigtails! Isn't she just the cutest thing? It is so stinkin' fun to finally have a girl to play with and to scrap for!

This layout is yet another tribute to stash scrapping. I've had all these supplies for months or even years! I couldn't find background paper in my stash that worked for the feel I wanted, so I found a round foam stamp and painted the polka dots on myself. It turned out just as cute as I'd hoped! I drew the wonky scalloped square myself as well on an ooooooooolllllddddd piece of patterned paper I thought I'd probably never use. But it was perfect for this page! I painted the chipboard shapes and sprinkled them with transparent glitter. TFL

Supplies:
Felt and chipboard shapes: Fancy Pants
Patterned paper: Paper Pizazz
Cardstock: DCWV
Title letters: Cuttlebug Olivia alphabet
Pig: Cricut My Community Cartridge, cut at 3"

Thursday, December 11, 2008

2 Sketches 4 You -- Kazan #15


It's been weeks since I had a chance to play along with 2 Sketches 4 You, but this sketch was so perfect I just couldn't miss another week. I designed this cute little owl and turned her into a cut file for my Cricut using SCAL -- LOVE IT! I think on the inside it will say "Whooo's the birthday girl?" or some other cute owl-y saying.


Supplies:
Cardstock - Bazzill
PP - DCWV (text), Chatterbox (plaid and stripe)
Buttons - Unknown (pink) and Autumn Leaves (everything else)
Punch (flower) - EKSuccess

Thursday, December 4, 2008

My first acrylic album


Wow, I can't believe it's been a whole month since I had a chance to post! It's been crazy around here -- two siblings got married, Thanksgiving, a craft fair, plus every day life!

My favorite current project is this acrylic album -- I've been wanting to try one of these forever, and I just love how it turned out. It was a fun challenge, having to think about how each page would look layered with the others instead of just taking one page at a time. This album is about Eliza's baby blessing and the beautiful dress that my dh's mom and grandma made for her. In our faith we don't believe in infant baptism, but we do gather together as a family for the father to give the baby a special blessing. Dan's mom and grandma put so much work and love into this dress, I wanted something special to honor that. The album itself is from Scrapworks, I believe, and the paper is from Fancy Pants. I used a Sizzix flourish die, and the flowers are my own design, cut with my Cricut machine and SCAL. I also added some rhinestones and ribbon. So sweet! TFL!


Tuesday, November 4, 2008

2S4Y - Laura #12


This week's sketch from 2 Sketches 4 You was a tricky one for me, but I like how the card turned out. I like the patchwork feel to it, and I think it will work well for one of my more free-spirited, eclectic sisters. This was a good card for using stuff from my stash that I haven't used in a while! The stamps are from CTMH -- one of those sets I just had to have, then never did much with. The pp and rub-ons are from the Scrapworks Florabella collection, and the vellum tag is from Joann's. I've also used a flower from Fancy Pants with a "skittle" in the center. I used mini-scallop scissors for trimming the circles, and a corner rounder for the larger scallop on the side. A little stitching is always a good touch, too! TFL!

Here's this week's sketch:


Also, check out this fun blog: On the Dot Creations. There are all sorts of cute things, and this week she is giving away a totally adorable apron. Check it out!

Monday, November 3, 2008

BBTB Scrapnfonts Challenge!


Another fun Christmas project for you! This week at Bitten By The Bug our challenge was to use the Christmas card from the Christmas Cheer cartridge along with a great font (SNF Classy Charm) and doodlebat (Tis the Season Modern) set from Scrap-n-Fonts. I used SCAL to cut the big snowflake from the doodlebat set and "JOY" from the font -- I LOVE having SCAL and being able to do that! I cut them from chipboard and covered them with white glitter, then added the cute little Santa from Christmas Cheer (he's cut at 2"). The papers are from Pebbles, Inc (the same collection I used on the nutcup project last week). So festive! TFL!

Saturday, November 1, 2008

Toot!

The new edition of the very cool Scrap-N-Art eZine is out, and I have 3 layouts being published in it! One of their features this month was die cuts, and you all know I'm all about that. Yay, Cricut! Be sure to check it out -- it's free, and the content is really great. Happy scrapping!

Thursday, October 30, 2008

Venturing away from paper for a moment...


While blogsurfing a few months ago I came across Bitty Booties -- an adorable pattern by Heather Bailey for sweet little booties that you can embellish to your heart's content. I totally fell in love with the idea, especially when I saw the hundreds of variations created by folks in the Bitty Booties Flickr Group. Holy moly, the possibilities are endless! It really satisfies my love for hand-stitching. These were my first go, which I thought would be perfect for Eliza for Halloween! I made a pair for my little niece Amelia, who is 9 days older than Eliza. They'll look so cute together tomorrow night! I've also got an adorable pink set in the works, as well as materials for a bunch more. Check out the Flickr group -- you'll see why I'm so intoxicated with them!

Tuesday, October 28, 2008

It's never too early for a little more Christmas!


I had SO much fun with this week's Bitten By The Bug challenge! Regina asked us to use the nutcup from Tags, Bags, Boxes and More for a Christmas project, which is really a great cut. It's cute as is, or it's a great blank canvas for all sorts of decoration! I cut the box at 5 1/2", which made a very good size nutcup. The finished project is about 3" tall, plus the ribbon. I added these adorable Hero Arts stamps, which I colored with Prismas and Gamsol and added some stickles just for fun. The round journaling spot above is from 7Gypsies, and I used a Stampin Up scallop punch for the circle behind it. PP is all from Pebbles, Inc. Check out all the other BBTB creations this week -- you'll definitely feel the Christmas spirit begin to flow! (And if you're still not in the mood for Christmas, there is a really cute Halloween take on it, too.) TFL!

Saturday, October 25, 2008

Bless You -- Laura's Sketch #11


When I saw Laura's sketch this week, I knew just what I wanted to do with it. My hubby's mom and grandma made the most beautiful dress for Eliza's baby blessing, and I wanted to create a special thank you card that would pick up some of the beautiful details from the dress. I rotated the sketch 90 degrees for this card. The lace is from Fancy Pants, and I sewed it to the card with the same ribbon used on the dress. The stamped image is a Tilda from Magnolia, which I colored with Prismas and Gamsol, then raised up on pop dots. The background is embossed with the Cuttlebug. The sentiment was what killed me on this card -- I didn't want to cover up any of the lace, and there wasn't too much room that wasn't covered with embossing. I tried a couple different stamped sentiments and rub-ons on various colors of paper but couldn't find anything I liked. "Thanks" and even "Thank you" just didn't seem like enough for the hours of work they both put into the dress. So I hit upon "Bless You!" and wrote it in myself. I'm pretty happy with how it turned out!

And here is a picture of my little angel in the dress that inspired the card!

Monday, October 20, 2008

Bitten by the Bug Christmas card


Ah, the first Christmas card of the season (for me, at least -- I know there are lots of you cardmakers who've been going since July!) -- this really gets me in the mood for my favorite season of the year! Our assignment at BBTB this week was to use this tree tag shape from the Joys of the Season cartridge with the card feature. I cut the card at 5 1/2", then cut the tree shape at 4" on real dial size in chipboard, light green, and polka dot green cardstocks for the different layers. I added rhinestones for a little bling and this great "celebrate the season" stamp from Stampin Up, done with white embossing powder. The pps are from Imaginisce. The scallop edge was done with the Fiskars Threading Water punch. TFL!

Wednesday, October 15, 2008

Kazan's sketch #11


My dear aunt and bestest bud Glynis is having a baby in December, and this great sketch from Kazan at 2 Sketches 4 You was the perfect jumping off point for this invitation to her shower! I love how this turned out -- the photo really doesn't do the sweet colors justice. Anyhoo, they've called this baby "Peanut" ever since they found out they were pregnant, so a little elephant seemed like the perfect touch. I'm in charge of the decorations and invitations, so I'm planning to coordinate everything with this scheme. I adore this baby boy paper collection from Cosmo Cricket. The elephant is from the Cricut Zooballoo cartridge, cut at 1 3/4", and I cut the circles with George at 2" and 1". The striped shape I designed on my computer and cut with SCAL. The background is embossed with the Cuttlebug Swiss Dots folder. To create the notebook edge, I used my Cropadile to punch the holes, then snipped them with scissors.

Be sure to check out Kazan's sketch this week!

Monday, October 13, 2008

Busy, busy!

This last week has been just crazy busy for me. My hubby's family was here over the weekend for a special family event -- Eliza's baby blessing! For that reason I have not had a lot of crafting time, but I did want to get some pages done for the album I do for my mother-in-law. They live in Washington and don't get to see us as much as they'd like, so I do a monthly layout with my favorite pics and send it to her. Well, that's how it's supposed to work in theory. The truth is I hadn't done a single layout for this year, but I figured now would be a good time! I got February - June finished, and here they are! I do this album almost entirely digitally, and nearly all of these use kits from Shabby Princess. You can see a larger version by clicking on any of the layouts. TFL!


This one use "grunge graph paper" and the Buddy Boy kit from Jenny Papai, which I'm about 78% sure came from Polka Dot Potato.

Friday, October 3, 2008

Sweet Eliza

You can see a larger version by clicking any of the images...


So my mom took my boys for a sleepover today and I thought Eliza's naptime would be the perfect time to clean the bathrooms... but instead I came into my office and finished this layout. Oops! Oh, well -- preserving our family history is more important than clean toilets, right?!

My big accomplishment with this particular project was figuring out how to add some "inking" to the edges of the photos and elements. I've struggled a little with digi-scrapping because it just didn't have the soft look I love with paper scrapping, which I usually add by doing things like inking the edges. This added a few steps, but I really loved the outcome. I bought this totally adorable digi-kit from the Shabby Princess shop. It's called Gabby, and I love it so much I think I may use it to redesign my blog. I LOVE their digi-kits -- they all have so many amazing elements. I also used this kit to create a little birth announcement for Eliza...


And while I'm on the subject of digi-scrapping, here's a layout I finished yesterday of this year's family reunion. This is another one for the album that I've given to my parents and all my siblings. We always have such a great time together -- I'm glad I can give everyone these layouts to remind them! :) This is another great Shabby Princess kit, called "Wonder."


Both of these layouts use Becky Higgins sketches. Love 'em!

Monday, September 29, 2008

Hippo -- I mean, Happy -- Birthday!


My dear friend Toby's cute little daughter just turned one, and this card is for her. The color scheme came from the gift bag it was going into. I love it when a card turns out just as cute as it was in your head! Despite the long list of materials, this one actually came together really quickly.

Materials:
Cardstock: DCWV
Hippo: Cricut Zooballoo cartridge, cut at 2"
Party hat: Celebrations cartridge, cut at 1 1/2"
Flower: EK Success punch
Glitter: Stickles
Scallop square: Mini-monograms cartridge, cut at 3 1/4"
Tag: Celebrations cartridge, cut at 1 1/2" (1 with tag feature + foundation tag as background) The "1" candle shape is filled with stickles, too
Embossing: Cuttlebug "Swiss Dots" folder, sanded to bring out the pattern
Ribbon: Offray
Safety pin: Making Memories (I think)

Wednesday, September 24, 2008

2 Sketches 4 You -- Laura #9


This will look like a quick entry, because I need to get lunch for the boys and feed the baby before taking Sammy to preschool -- never a dull moment in these parts!

Laura created this fun sketch on my favorite card sketch/challenge blog -- 2 Sketches 4 You, of course! I thought that top line was a great space for a quote, and for some reason this is the one that came to mind. Then I thought turning that bottom element into a lily pad would be fun, and this card just sounded too fun not to make. I don't have a use for it right now, but I do have 4 unmarried sisters so I'm sure I'll find an occasion for it in the future! :)

The pp is all from My Mind's Eye, Magnolia collection. The scallop circle was cut at 5 1/2" with the Cricut Mini-Monograms cartridge, the frog is from Paper Dolls at 1 1/2", and the crown is from Alphalicious, sized in Design Studio. The water lily is a hydrangea punch from Martha Stewart. Fun stuff -- thanks for looking!

Saturday, September 20, 2008

2 Sketches 4 You -- Kazan #9


Better late than never! I've been working on this card in 5 minute increments all week -- man, I've gotta get in a new rhythm with the new baby so I can get some crafting time!

Kazan's sketch this week was too good to pass up, so I was excited when my sweet little sister-in-law got engaged and gave me a good excuse to use those 5 extra minutes a day on a card instead of laundry! She has a bright, fun personality, and I though this funky Sassafrass Lass paper was perfect for her. The heart-flower stamp is from Art Warehouse, and I used Prismas and Gamsol for the coloring, and I added some green ice Stickles to the center and leaves. I cut the background shape with my Cricut and SCAL.

Phew! So glad I got something created this week!

Friday, September 5, 2008

Sorry I've been MIA...

... but I have a good excuse! Our little cutie Eliza was born last Wednesday, and she has us all wrapped around her very little finger. If you'd like to see pics, feel free to check out my family blog. I should be able to find some time for crafting again soon (at least I hope so -- I'm already having withdrawals!), so stay tuned!

Monday, August 25, 2008

Here's to you, little butterfly...


I've been thinking about this layout for a long time. These are the last pictures I took of my little sister Carissa before she passed away, and I was struck by the butterfly picture in the background, and how well that fit with the lyrics to this beautiful song by Susannah Clifford Blachly. Here are those lyrics, in case you can't read them:

“Here's to you, little butterfly
You grew wings and learned to fly
You broke through to a clearer view
And a wide open sky

You taught me things I need to know
When to hold on tight, when to let go
How to trust that the darkest hour of the night
Holds the promise of the light

Now I know that some day you'll be leaving
To heed the call of distant lands
And though I'll be no stranger to grief
I'll still open up my hands
And watch you fly, little butterfly

Here's to you, little child of mine
You'll be all grown up in no time
So much to learn through the twists and turns of this life

You taught me things I need to see
How to love the world that's in front of me
How to feel what's true and to listen to what it means to be free”

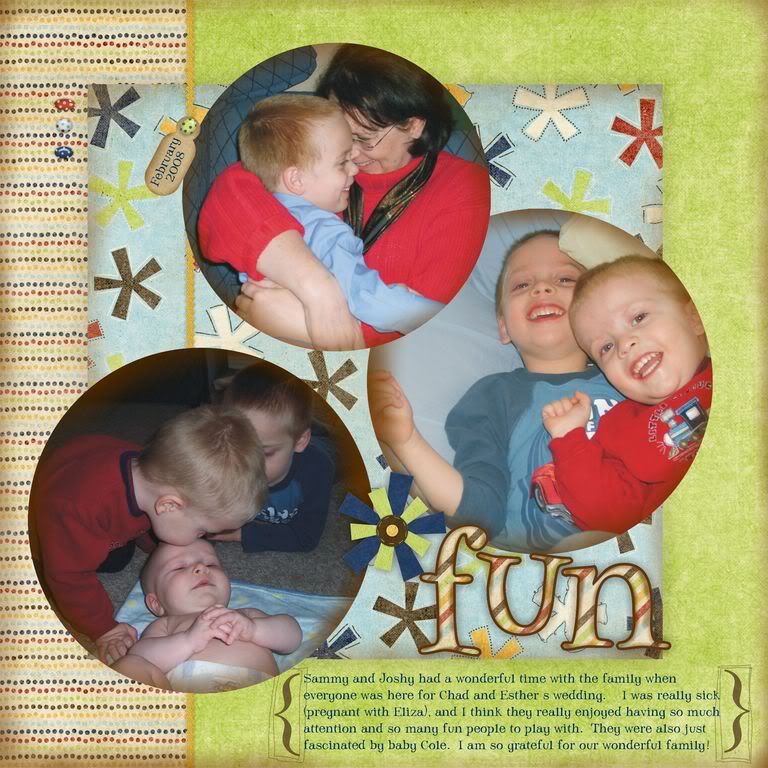
And here's my journaling:
"These are the last pictures I took of Carissa before she passed away, during the brief time she had been moved out of the intermediate care unit and the boys could visit her. Originally when I was working with this photo I cropped out most of the background, but then I noticed the butterfly photo in the background, and I thought it was so fitting. Carissa spent mortality in a body that was in some ways so limiting, but her beautiful spirit always shone through. In her passing, that spirit emerged more beautiful and radiant than any earthly butterfly. I know that Carissa is free now from the limitations of her mortal life and shines as a jewel in our Heavenly Father’s kingdom."

It was also a perfect opportunity to try out a new idea I had for making butterflies. It's a take-off from the flower technique I posted a while back, and I really like the way it turned out. I thought someone out there might like instructions, so I did a little photo tutorial as I went along.

1. Cut your base shape -- I cut mine with the Cricut George cartridge. It's , above the J. I cut it first on shadow with the cardstock and then regular with a light vellum. Adhere together as shown.


2. Sew a straight line from corner to corner as shown.


3. Trim out shape of wings (just like the flower petals from the previous technique). For butterflies, cut the top wings larger and rounder than the bottom. If they are the same, you'll get a shape more like a dragonfly.


4. Fold top layer away from bottom layer at stitched lines -- this gives it a really pretty dimensional element. I also used a mini-scallop scissor to add some detail to the wings on the larger butterflies, but it's too much of a pain to do it to the smaller ones.


5. Add a body. Mine is the dragonfly body from the Cricut Doodlecharms cartridge (hint: cut the body 1/2" smaller than your original shape -- ie, my largest butterfly was cut at 3", and the body was 2 1/2") Embellish as desired. I used thread to stitch glass beads onto the largest butterflies here, but on the card below I covered the whole body in Stickles.


Here is another card I made when I was trying out these butterflies. This card also uses last week's great sketch from 2 Sketches 4 You.


Supplies used:
(Layout)
Bazzill cardstock
Misc. vellum
Green Ice Stickles

(Card)
Kraft cardstock: Hobby Lobby
Patterned paper, ribbon: Fancy Pants
Stamp: Studio G
Mini-Scallop scissors, Threading Water (scallop) punch: Fiskars
Green Ice Stickles
Ink: Clearsnap Chalk Ink

Another note -- I made this layout to go in the book of remembrance I made for my family after Carissa passed away. Here is a link to those layouts (posted on the Cricut MB), if you'd like to see them.

Woohoo!

Wow! My "it's a girl" card from last week made it in the Fab 5 on 2 Sketches 4 You! I am so excited, because I have been amazed by the talent of all the people who submit cards there every week, and especially those who have been chosen for the Fab 5 in the past. Thanks, Kazan, Laura, and the DT!

Wednesday, August 20, 2008

I love hand stitching!


It does take a long time, but for a very special card there is nothing I love more than hand stitching. This baby card is for my brother and SIL who just had their first baby (yay, I have a niece!), and I really love the handstitching on the buttons. For this card I used this week's sketch from 2 Sketches 4 You -- it was just perfect for this stamp! A friend gave it to me unmounted, so I have no idea what company it came from, but I think it's just adorable.


For the birthday card I used a Bazzill In Stitchz template and added the french knots for a little extra pizzazz. This is actually last week's sketch from 2 Sketches, but I didn't finish it in time to upload it there.

Supplies used
(Baby Card) Velvet ribbon -- Fancy Pants
Buttons -- All My Memories
Glitter -- Stickles Cotton Candy
Jewels -- Westrim Crafts
Scalloped square -- Cricut Mini-Monograms cartridge, cut at 1 1/2" on RDS
Embossing -- Cuttlebug Swiss Dots folder
Other - chalk ink, cotton thread, foam squares, mystery stamp

(Birthday card) Patterned Paper -- Scrapworks
Flowers -- Making Memories
Stitching Template -- Bazzill In Stitchz
Stamp -- Imaginisce
Jewel brad -- Joann Craft Essentials

Tuesday, August 12, 2008

Christmas Cuties


Our challenge for BBTB this week was to use this adorable stocking from Christmas Cheer in a non-traditional color (anything but red). Although I don't usually make layouts before I have pictures, I knew exactly what I wanted to do with this one! (Waiting for this baby has done this to me a lot!) My SIL is having a baby any day now, and we're so looking forward to having our two little babies at the same time. We'll be together at Christmas, and I thought this would be just perfect for some Christmas pictures of our two little lovies together. The only catch is, they don't know whether they're having a boy or a girl -- they're some of those crazy people who like to be surprised... ;) Luckily, this paper and layout have enough pink and blue that we could fit a baby boy in there if we HAVE to, hee hee!

Materials used:
Patterned Paper: Scenic Route
"Celebrate the Season" Stamp and Scallop Punch: Stampin' Up
Journaling Stamp: Autumn Leaves
Acrylic letters and heart: Heidi Swapp (I used acrylic paint to highlight the edges and sewed them to the page with pink embroidery floss)
"Christmas": Cricut Opposites Attract cartridge, sized and welded in CDS, in both chipboard and cardstock
Stocking: Cricut Christmas Cheer cartridge, cut at 4" and embossed with the Cuttlebug. Top and toe are covered in fun flock!
Snowflake: Cricut Christmas Cheer cartridge
Cardstock: DCWV

Here are some close ups of my favorite elements:

Sunday, August 10, 2008

I've been nominated for...


Thanks so much to Lori, author of a great new blog called LiveLaughScrap and The Daily Scrapper -- they've both given me this fun award! It means a lot to me to know people actually check my blog out and appreciate my creations, so thanks, ladies!

So here's how this award works:
1. Post the logo on your blog.
2. Add a link to the person who gave you tha award.
3. Nominate 7 other bloggers who you think deserve it.
4. Add links to their blogs on yours.
5. Leave a message on your nominees blogs.

I have awarded this to:
Kazan at Nunu Toolies
Jason at ScrappinDad's Scribbles
Amy at ScrapbookingMommy
Teri at TeriBeri
Sonia at SKScrap
Diane at Capadia Designs
Tammy at Paper Pastimes

All these amazing bloggers inspire me, and I appreciate the time and effort they put into their blogs and especially their projects! Thanks, ladies and gent!

Monday, August 4, 2008

2 Sketches 4 You this week!


Another Monday, another yummy sketch from Kazan at 2 Sketches 4 You! I had lots of fun with this one.

Supplies:
Paper: Sassafrass Lass (I just love their fun and funky papers)
"thanks": Cuttlebug Olivia font
Stamp and scallop punch: Stampin Up
Flower: Fancy Pants
Acrylic heart: Heidi Swapp
Liquid glass (on the little heart in the middle of the stamp)
Brad and black stamping ink: JoAnn Essentials
Cardstock: Provo Craft and DCWV

Here's the sketch of the week!

A Little One is on the way! -- LO for BBTB


I love the New Arrival cartridge for the Cricut machine -- it's a must-have if you have any baby things to do at all. Our challenge over at Bitten By the Bug this week was to use the train cut. This layout isn't my favorite -- one of those things that just didn't turn out on paper the way it looked in your head -- but you should definitely check out all the other creations this week. The projects are just too cute, and a lot of them show how versatile this cart really is!

All the cuts here are from New Arrival. I sized the train in CDS, and I cut all the other little shapes at around 2". "Little One" is cut at 1 1/2". I use Making Memories paper, a Jolees flower on the baby, and some ric-rac. I sewed the mat for the picture to make a journaling pocket. I'm not sure what I'm going to do with this lo -- I may use it for a picture from the baby shower my family is doing for me, or I may save it as a gift for someone else.

Friday, August 1, 2008

Family Fun -- layouts for our family album


I'm the only scrapbooker in my family (not for lack of trying to convert my mom and sisters, though!), so when I do pages of big family events, I scan them in and get copies printed for everyone in the family (Costco is a great resource for this, btw). I started doing this when my little sister went on a mission for our church, so she would have something fun when she was homesick, and also so she could introduce people to our happy, goofy family. Now that more people are growing up and spreading out, it's more important to me than ever. I love it! I scrap in 12x12, generally speaking, but the books I made for everyone else are 8x8 -- it's just easier and cheaper to print and ship all the pages that way.

My little brother Eric is just as camera happy as I am, and when we are both on a trip we end up with mountains of pictures -- hooray! He's also a very talented photographer, which is why some of these pictures are super nice and some are just run-of-the-mill (those would be mine...) That just leaves me with the dilemma of which to pick, so I always need a lo with tons of picture space. I couldn't do it with just one double-page lo in this case, so I did two almost identical layouts for the book.

I like to coordinate the colors of the pictures with paper and embellishments, but in this case nearly every pic had different colors! I also wanted something that reflected how much fun we had on this trip. I found this great striped paper in my stash (by My Mind's Eye, Magnolia stack) that definitely fit the bill. But I didn't want it to clash, so I mounted the photos on kraft paper (which reminded me of the sand on the beach at the lake). I also added some decorative stitching and used my Heidi Swapp edge-distressor on the kraft paper (love that tool!). The flowers are cut from some coordinating pp, and the title is cut with the Cricut Base Camp cartridge. I cut the journaling block with SCAL. TFL!